This lesson series I will teach you the basics of how to use Microsoft Visual Studio IDE with graphical examples.
In previous lesson I teach you Simple Tips of Visual Studio 2010 and how to use them in useful manner.
Now I’m going to tell you about the intellisense of the VS2010 and how to use it in the coding and the design. Getting know about the VS2010 IDE well means you can use it well for your future coding practices very easily.
What is Intelisense?
IntelliSense is the general term for a number of features: List Members, Parameter Info, Quick Info, and Complete Word. These features help you to learn more about the code you are using, keep track of the parameters you are typing, and add calls to properties and methods with only a few keystrokes.
Many aspects of IntelliSense are language-specific. For more information about IntelliSense for different languages. It makes simple to coding and it makes simple to learn about the entire syntaxes, parameters and the properties that VS2010 helps for the C#.
Intellisense is available any version of VS and languages like VB, C#, ASP.NET, ADO.NET and so on. This is invented by Microsoft itself to help programmers and make them more effective with make them faster coders.
- List Members
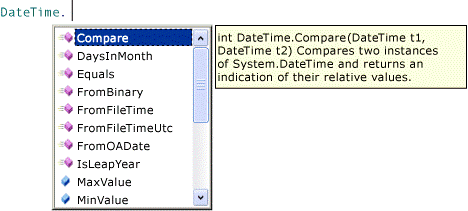
A list of valid members from a type (or namespace) appears after you type a trigger character (for example, a period (.) in managed code or in C#). If you continue typing characters, the list is filtered to include only the members that begin with those characters.
After selecting an item, you can insert it into your code by pressing TAB or by typing a space. If you select an item and type a period, the item appears followed by the period, which brings up another member list. When you select an item but before you insert it, you get Quick Info for the item.
In the member list, the icon to the left represents the type of the member, such as namespace, class, function, or variable. For a list of icons, see Class View and Object Browser Icons. The list may be quite long, so you can press PAGE UP and PAGE DOWN to move up or down in the list.

You can invoke the List Members feature manually by typing CTRL+J, clicking Edit/IntelliSense/List Members, or clicking the List Members button on the editor toolbar. When it is invoked on a blank line or outside a recognizable scope, the list displays symbols in the global namespace.
To turn List Members off by default (so that it does not appear unless specifically invoked), go to Tools/Options/All Languages and deselect Auto list members. If you want to turn off List Members only for a specific language, go to the General settings for that language.
You can also change to suggestion mode, in which only the text you type is inserted into the code. For example, if you enter an identifier that is not in the list and press TAB, in completion mode the entry would replace the typed identifier. To toggle between completion mode and suggestion mode, press CTRL+ALT+SPACEBAR or click Edit/IntelliSense/Toggle Completion Mode.
- Parameter Info
Parameter Info gives you information about the number, names, and types of parameters required by a method, attribute generic type parameter (in C#), or template (in C++).
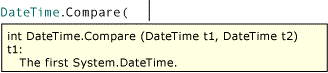
The parameter in bold indicates the next parameter that is required as you type the function.
For overloaded functions, you can use the UP and DOWN arrow keys to view alternative parameter information for the function overloads.

When you annotate functions and parameters with XML Documentation comments, the comments will display as Parameter Info. For more information, see Supplying XML Code Comments.
You can manually invoke Parameter Info by clicking Edit IntelliSense/Parameter Info, typing CTRL+SHIFT+SPACE, or clicking the Parameter Info button on the editor toolbar.
- Quick Info
Quick Info displays the complete declaration for any identifier in your code.

When you select a member from the List Members box, Quick Info also appears.
You can manually invoke Quick Info by clicking Edit/IntelliSense/Quick Info, typing CTRL+I, or clicking the Quick Info button on the editor toolbar.
If a function is overloaded, IntelliSense may not display information for all forms of the overload.
You can turn Quick Info off In C# by setting Tools/Options/Text Editor/C/C#/Advanced/Auto Quick Info to false.
- Complete Word
Complete Word completes the rest of a variable, command, or function name once you have entered enough characters to disambiguate the term. You can invoke Complete Word by clicking Edit/IntelliSense/Complete Word, typing CTRL+SPACE, or clicking the Complete Word button on the editor toolbar.
- IntelliSense Options
IntelliSense options are on by default. To turn them off, click Tools/Options/Text Editor and deselect Parameter information or Auto list members if you do not want the List Members feature.
- Troubleshooting IntelliSense
The IntelliSense options may not work as you expect in certain cases.
The cursor is below a code error. You might not be able to use IntelliSense if an incomplete function or other error exists in the code above the cursor because IntelliSense might not be able to parse the code elements. You can resolve this problem by commenting out the applicable code.
The cursor is in a code comment. You can't use IntelliSense if the cursor is in a comment in your source file.
The cursor is in a string literal. You can't use IntelliSense if the cursor is in the quotation marks around a string literal, as in the following example:
MessageBox( hWnd, "String literal|") )
The automatic options are turned off. By default, IntelliSense works automatically, but you can disable it. Even if automatic statement completion is disabled, you can invoke an IntelliSense feature.
If you change your IntelliSense settings, then your new settings will apply to IntelliSense in both the Code Editor and the Immediate Mode Command Window.
- To turn IntelliSense options OFF by default
1. On the Tools menu, click Options.
2. Select the Text Editor folder.
3. Select the folder for the language you want to customize IntelliSense.
4. In the General property page, clear check boxes for IntelliSense features that you do not want:
o Auto list members applies to List Members
o Auto list members applies to List Members
o Parameter information applies to Parameter Info
When you do your coding this intellisense will appear all the time, try to use it maximum to speed up your coding well and always read the comments given by the intellisense, which will make you learn more.
Most Importantly C# is case sensitive language, therefore make sure use proper way to declare the names and when intellisense show them while coding, select the required things carefully.
This is brief overview about the VS2010, which will give you the basic tips of VS2010 to you. Hope it will help you lot.
For more IT & IS related topics visit www.uncopyrightables2011.blogspot.com