This lesson series I will teach you
the basics of how to use Microsoft Visual Studio IDE with graphical examples.
In previous lesson I teach you how
to start the Visual Studio 2010 and create a C# project and save in given
location in different methods.
Now I’m going to tell you about the
overview of the VS2010 and how to use its properties, functions easily. Getting
know about the VS2010 IDE well means you can use it well for your future coding
practices very easily.
VS2010 Menu Bar

In here you can see several menus,
which will help you to use different functions during your development. Each
menu has several sub menus which give similar kind of functions or the
activities.
You can use same functions
categorized in different tool bars, for that you have to pin them. Then they
will visible below the menu bar. But you can adjust their positions as your
wish and use them with just a click.
Here you
can see different tool bars below.
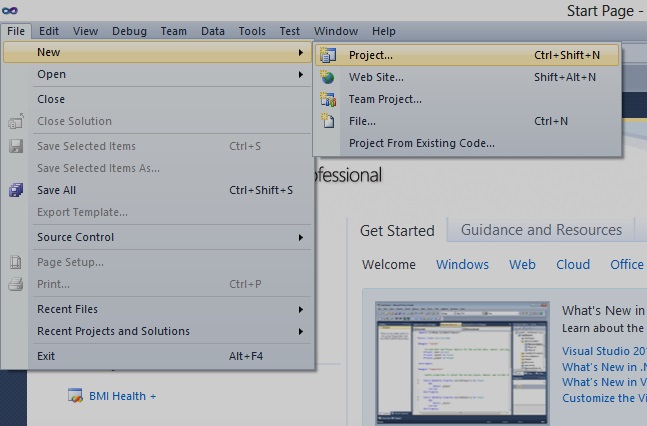
File:
 From this
you can create new project, open existing project or add existing project can be
done. Apart from that you can save the project and save in different locations
with different formats too. You can export your project template also.
From this
you can create new project, open existing project or add existing project can be
done. Apart from that you can save the project and save in different locations
with different formats too. You can export your project template also.
Edit:

In here you can undo, redo the
actions you done in the project, you can use cut, copy, paste, save or delete
functions to modify the code too. Most importantly you can use find and replace
function to replace some words in the project.
View:
 Here you can see several functions
related to coding, you can view the code view and the designer view with forms.
Apart from that you can see class view, error list, out puts of the code. You can
enable toolbox items here also with just a click. Using toolbars you can select
which toolbar should be in the main screen, which will help you for do coding
easily.
Here you can see several functions
related to coding, you can view the code view and the designer view with forms.
Apart from that you can see class view, error list, out puts of the code. You can
enable toolbox items here also with just a click. Using toolbars you can select
which toolbar should be in the main screen, which will help you for do coding
easily.
Project:
 Add new forms, classes, reference,
service reference, components, new items related to C# and add existing items
like pictures can do here. You can see the project properties at the bottom of
the list.
Add new forms, classes, reference,
service reference, components, new items related to C# and add existing items
like pictures can do here. You can see the project properties at the bottom of
the list.
Build:
 Here you can see the project
building options. You can use them as needed to the project.
Here you can see the project
building options. You can use them as needed to the project.
Debug:
 Debug the project can be done here,
but most importantly you can start without debugging the project. You can use
break points to debug the project.
Debug the project can be done here,
but most importantly you can start without debugging the project. You can use
break points to debug the project.
Team:
 This is use to connect Team
Foundation Server.
This is use to connect Team
Foundation Server.
Data:
 Adding new SQL, MySQL, Access or
other database is possible here.
Adding new SQL, MySQL, Access or
other database is possible here.
Format:

Formatting the
code view can be done here. Alignments and ordering also can be done here.
Tools:
 Database connectivity, server
connectivity and even SharePoint sever connectivity also available for the
project. We can select toolbox items which is really needed for your project.
Library packages can be manage here. You can use external tools for the project
along with import and export settings.
Database connectivity, server
connectivity and even SharePoint sever connectivity also available for the
project. We can select toolbox items which is really needed for your project.
Library packages can be manage here. You can use external tools for the project
along with import and export settings.
Test:

Here you can run or debug the
project and see the output along with select different test settings and edit
test settings.
Window:

This is all about windows of the
project like .cs , .txt, .xml extension windows.
Help:
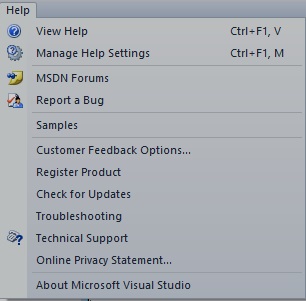 This is all about solving problems
that arises for the programmer during the coding and debugging. You can use
this for any issue that arises in your coding too.
This is all about solving problems
that arises for the programmer during the coding and debugging. You can use
this for any issue that arises in your coding too.
Toolbox:
 Here you can see all the tools like
buttons, labels, text boxes and many more which we can use for our entire
programming. If you select All Windows Forms you can see all tools together or
else you can select the category which
show the bunch of related tools.
Here you can see all the tools like
buttons, labels, text boxes and many more which we can use for our entire
programming. If you select All Windows Forms you can see all tools together or
else you can select the category which
show the bunch of related tools.
Solution Explorer & Properties Window:
 In solution explorer you can see whatever
the Forms, C# code .cs files, references, existing files include in the
project. Be careful about these files, you have to give more priority to this
section at all.
In solution explorer you can see whatever
the Forms, C# code .cs files, references, existing files include in the
project. Be careful about these files, you have to give more priority to this
section at all.
In Properties you can see the
properties of the forms, layouts, sizes, commands and so on. According to your
wish they can be used. But you have to be careful about changing the
properties. Reason for that is small change without proper knowledge about you
will give errors and messed up you too.
This is brief overview about the VS2010, which will give you the basic
tips of VS2010 to you.
Hope it will help you lot.
Any Questions??
Mail me: call.rohana@gmail.com
For more IT
& IS related topics visit www.uncopyrightables2011.blogspot.com